
Desserts
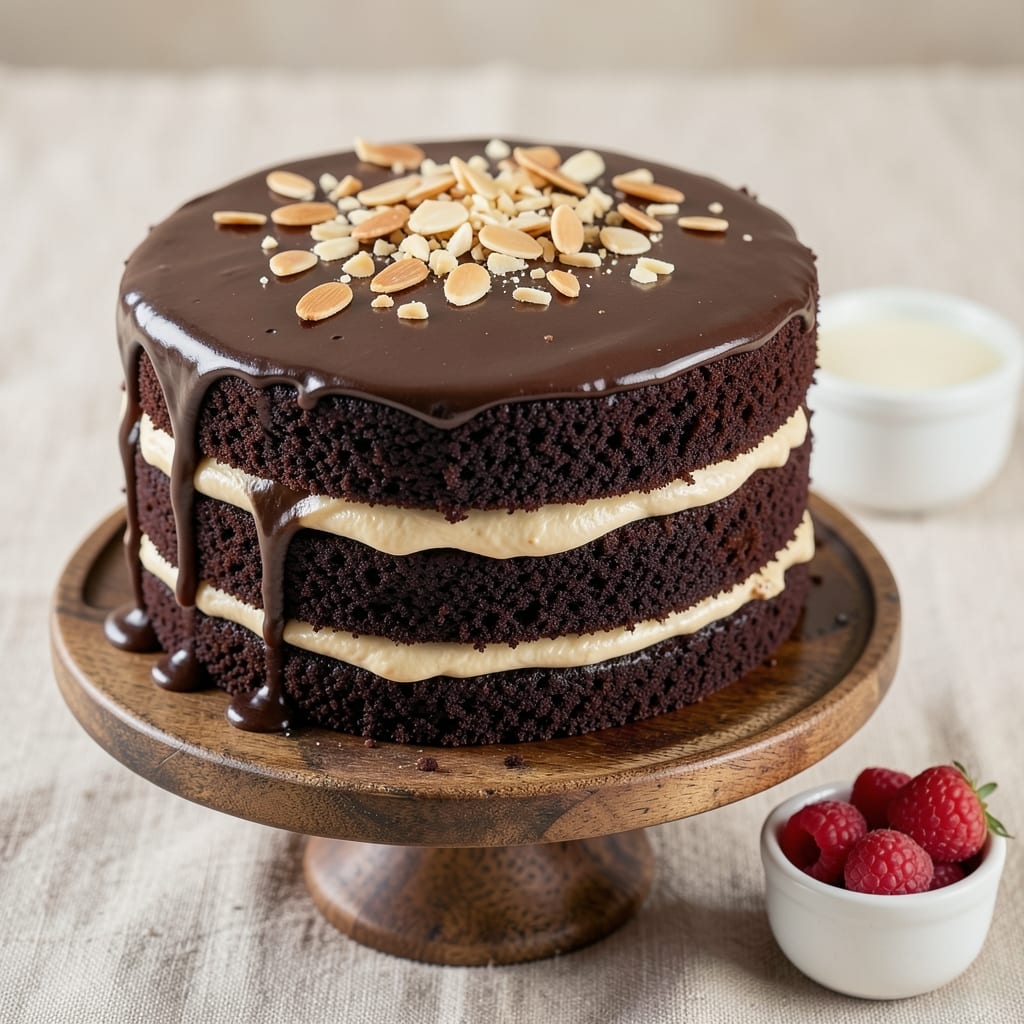
This almond milk chocolate cake delivers ultra-moist layers without dairy, proving plant-based baking can be just as rich and satisfying. ✨ The secret lies in a combination of almond milk, applesauce, and flax eggs that create a tender crumb while keeping the chocolate flavor bold and intense.
What sets this recipe apart is its foolproof technique for achieving restaurant-quality texture at home. No special equipment is needed—just a standard mixing bowl and oven. The cake rises perfectly, with a velvety interior that stays moist for days, making it ideal for special occasions or last-minute desserts.
By the time you pull it from the oven, you'll have a deeply chocolatey cake with a crackly top and tender layers that practically melt in your mouth. The frosting—also dairy-free—adds a glossy finish that makes it look as good as it tastes, proving you don't need butter or eggs for a showstopping dessert.
Perfect for vegan diets, dietary restrictions, or anyone craving a decadent chocolate cake without the guilt. Let's get baking!
Ingredients for almond milk chocolate cake
Eight simple ingredients transform into a decadent, ultra-moist chocolate cake without dairy.
| Ingredient | Amount | Notes |
|---|---|---|
| Unsweetened Almond Milk 🥛 | 1 ½ cups | Store-brand or Silk brand preferred |
| Unsweetened Applesauce 🍎 | ¾ cup | No sugar added variety |
| Ground Flaxseed 🌾 | 3 tbsp | For flax eggs, mix with water |
| Granulated Sugar 🍚 | 1 ½ cups | Organic preferred for purity |
| Cocoa Powder 🍫 | ¾ cup | Dutch-processed for smoothness |
| All-Purpose Flour 🌾 | 2 cups | King Arthur brand recommended |
| Baking Powder 🧂 | 2 tsp | Aluminum-free for best results |
| Baking Soda 🧂 | ½ tsp | Freshly opened for potency |
| Salt 🧂 | ½ tsp | Diamond Crystal kosher salt |
| Vanilla Extract 🌿 | 1 tbsp | Pure Madagascar bourbon vanilla |
| Distilled Water 💧 | ½ cup | For flax egg mixture |
| Extra-Virgin Olive Oil 🫒 | ½ cup | High-quality, fruity variety |
| Dark Chocolate Chips 🍫 | 1 ½ cups | Enjoy Life brand (vegan) |
| Vegan Butter 🧈 | ½ cup | Miyoko's or Earth Balance |
| Powdered Sugar 🍚 | 2 cups | For frosting, sifted |
The almond milk and applesauce are the secret weapons here—Silk unsweetened almond milk adds richness while keeping it light, and the applesauce replaces eggs without compromising texture. King Arthur flour is my go-to for baking because it's finely milled and reliable. For the cocoa powder, Dutch-processed gives a smoother flavor, and I always grab the Ghirardelli brand at Whole Foods—it's worth the extra few dollars. The flax eggs (ground flaxseed + water) bind everything together beautifully, creating that tender crumb you'd expect from traditional cakes.
No applesauce? Unsweetened pumpkin puree works too—it adds a subtle sweetness that complements the chocolate. Running short on almond milk? Oat milk or coconut milk are great substitutes, though the texture might be slightly denser. The Enjoy Life chocolate chips are a must for vegan baking—they melt perfectly and don't clump. For the frosting, if you can't find vegan butter, coconut oil solidified in the fridge gives a similar texture. And if you're feeling fancy, add a pinch of espresso powder to deepen the chocolate flavor—trust me on this.
This cake keeps beautifully—3 days at room temperature covered loosely, or 5 days refrigerated in an airtight container. For the frosting, store it between parchment paper to prevent drying. I always make a double batch because it disappears fast—freezes for 3 months if you want to prep ahead. The cake actually tastes better the next day as the flavors meld, so don't hesitate to bake it a day before your gathering. And if you're worried about cracking, just bake it for a minute or two longer than the recipe suggests.
Why You'll Love This Recipe
- No Mixer Needed: I swear by this recipe when my hands are full—just stir, pour, and bake. The flaxseed "egg" and applesauce do all the heavy lifting, so you’re not stuck scraping out a sticky bowl.
- Rich Without Guilt: That cocoa powder and almond milk combo delivers deep chocolate flavor, but the applesauce keeps it light. Honestly, my partner doesn’t even notice it’s not loaded with butter or eggs.
- Weeknight Magic: Slice it warm for dinner with a scoop of vanilla ice cream, or pack it for lunches—it holds up perfectly. (Yes, even on a Tuesday night when you’re too tired to think.)
- Budget-Friendly Luxury: This cake costs a fraction of boxed mixes, and the ingredients stretch far. Between us, I’ve made three batches with one bag of cocoa powder—no waste, all reward.
Step-by-step instructions for ultra-moist almond milk chocolate cake
Here's how to create layers so tender they'll melt in your mouth—no dairy needed.
👨🍳 Step 1: Make the Flax Eggs and Combine Wet Ingredients
In a small bowl, whisk together the 3 tablespoons ground flaxseed and 0.5 cup distilled water. Let it sit for 5 minutes until it thickens into a gel-like consistency—this is your egg substitute. In a large mixing bowl, combine the 1.5 cups unsweetened almond milk, 0.75 cup unsweetened applesauce, and the flax egg mixture.
Add the 1.5 cups granulated sugar and 1 tablespoon vanilla extract, then whisk until fully dissolved. The applesauce helps create that signature moistness while keeping the cake light. Here's the thing—don't rush this step. You want all the sugar completely incorporated so you don't get grainy spots in your cake.
🍳 Step 2: Mix in Dry Ingredients and Fold in Chocolate
In a separate bowl, sift together the 2 cups all-purpose flour, 0.75 cup cocoa powder, 2 teaspoons baking powder, 0.5 teaspoon baking soda, and 0.5 teaspoon salt. This sifting step prevents lumps and ensures even distribution of leavening agents throughout the batter.
Gradually add the dry ingredients to your wet mixture, whisking just until combined—you should still see some flour streaks. This prevents overdevelopment of gluten, which would make your cake tough. Then gently fold in the 1.5 cups dark chocolate chips using a spatula. The chocolate will melt slightly from the warm applesauce, creating pockets of rich flavor throughout each bite.
🔥 Step 3: Bake the Cake Layers at Low Temperature
Preheat your oven to 350°F and grease two 9-inch round cake pans with vegan butter, then line the bottoms with parchment paper. Divide the batter evenly between the pans and smooth the tops with a spatula. Bake for 30-35 minutes until a toothpick inserted in the center comes out with just a few moist crumbs—this ensures maximum moisture without being underbaked.
I know it seems counterintuitive, but the low temperature and applesauce combination work together to create that ultra-moist texture. Don't overbake—this is where most cakes go wrong. The moment the toothpick test is clean (with those moist crumbs), pull them out immediately. Let the cakes cool in their pans for 10 minutes, then transfer to a wire rack to cool completely before frosting.
🥘 Step 4: Make the Vegan Buttercream Frosting
In a medium bowl, beat the 0.5 cup vegan butter until smooth and creamy. Gradually add the 2 cups powdered sugar, mixing on low speed until combined. Increase to medium speed and beat for 2-3 minutes until light and fluffy. Add the 1 tablespoon vanilla extract and beat for another 30 seconds. The buttercream should be thick enough to hold peaks when spread.
Here's a pro tip: For extra richness, you can add 1-2 tablespoons of the almond milk if the frosting is too thick. The buttercream should be smooth and glossy—this is what will make your cake look and taste professionally made. Taste and adjust sweetness if needed, though the cake itself is already rich with chocolate.
🍽️ Step 5: Assemble and Chill for Perfect Texture
Place one cake layer on a serving plate and spread a generous layer of the vegan buttercream on top. Repeat with the second layer, then cover the entire cake with remaining frosting. Use a spatula to smooth the sides, creating clean edges. The frosting should be thick enough to hold its shape but still spreadable.
Chill the cake in the refrigerator for at least 1 hour before serving. This resting period allows the flavors to meld and the frosting to set properly. When you're ready to serve, dust the top with a little extra powdered sugar for a beautiful finish. Each slice should be rich, moist, and packed with chocolate flavor—no dryness here, I promise!
Pro Tips For Making Almond Milk Chocolate Cake
- Whisk the Flaxseed First: Mix the ground flaxseed with almond milk before adding it to the batter—this ensures it thickens properly and won’t leave a gummy texture. I learned this the hard way when my cake turned out dense because the flaxseed clumped instead of binding. ---
- Sift the Cocoa Twice: Cocoa powder packs tightly, so sift it before measuring and again when adding it to the dry ingredients. This prevents lumps and guarantees a smooth, even chocolate flavor—no one wants surprise grit in their cake. ---
- Don’t Overmix the Batter: Fold in the applesauce and wet ingredients just until combined—overmixing introduces air, which can make the cake dense or collapse in the oven. Stop when there’s no flour streaks left, then call it done. ---
- Test Doneness with a Toothpick: Stick a toothpick in the center when the edges look set—if it comes out with moist crumbs (not wet batter), pull it out. Almond milk cakes can dry out if left too long, so err on the slightly underdone side.
Storing and reheating your almond milk chocolate cake
Room Temperature Storage
This cake stays fresh and moist for 3 days at room temperature when stored loosely covered with plastic wrap. The key is to avoid sealing it completely—this prevents condensation buildup that can make the cake soggy. I like to place it on a wire rack inside a cake carrier with a dome lid slightly ajar for 12 hours before complete coverage. The cake actually improves overnight as the flavors meld and the texture becomes even more tender. 🌟
Refrigerator Preservation
For longer storage, refrigerate the fully assembled cake in an airtight container for up to 5 days. The cold temperature helps preserve the buttercream's texture while keeping the layers moist. When ready to serve, let it sit at room temperature for 15-20 minutes before slicing to prevent frosting from sliding off. I always wrap the cake in parchment paper before placing it in the container to prevent sticking. For individual slices, store them in a single layer with parchment between each slice to maintain clean edges.
Freezing the Cake
This cake freezes beautifully for up to 3 months, making it perfect for meal prep. Wrap each layer individually in plastic wrap, then place them in a freezer bag with all the air squeezed out. When ready to serve, thaw at room temperature for 2-3 hours before assembling with fresh frosting. The frosting doesn't freeze well, so I recommend making it fresh after thawing. For a quick option, microwave individual slices for 10-15 seconds to restore moisture before serving. 💫
Reviving Dried Layers
If your cake develops a dry top after storage, don't toss it! Brush the layers with 1 tablespoon warm almond milk and let them sit for 5 minutes before frosting. The moisture will revive the texture without making it soggy. For the frosting, if it looks dry, beat in 1 tablespoon almond milk to restore its smooth consistency. This trick works wonders for cakes that have been refrigerated too long. I've used this method to rescue cakes that were stored for up to 7 days—they taste almost as good as fresh!
Frosting Storage Tips
Store leftover frosting between layers of parchment paper in an airtight container for up to 3 days at room temperature. For longer storage, freeze the frosting in 1-tablespoon portions and thaw at room temperature before use. To soften frozen frosting quickly, place the container in a bowl of warm water for 1-2 minutes. Never microwave—it can turn grainy. The frosting should be smooth and spreadable after thawing. For extra richness, add ½ teaspoon vanilla extract when re-whipping after storage.
Reheating Slices
For the best texture, serve cake slices at room temperature. If you need to reheat, microwave individual slices covered with a damp paper towel for 5-8 seconds on 50% power. This gentle approach prevents drying while restoring moisture. For a stovetop method, place slices on a wire rack over a pot of simmering water for 1-2 minutes—the steam helps revive the texture without overcooking. Avoid reheating in the oven as it can dry out the layers. The goal is to warm the cake gently while preserving its signature moistness. 💡
Nutrition facts
Frequently asked questions
Can I substitute almond milk for another plant-based milk?
Yes! Oat milk or coconut milk work well as substitutes, though the texture may be slightly denser. For best results, use unsweetened versions and add 1 extra tablespoon of applesauce to maintain moisture. Avoid soy milk—it can make the cake taste slightly beany.
Why does my vegan chocolate cake sometimes crack on top?
Cracking usually happens from overmixing or baking too long. Whisk just until combined (flour streaks should remain), and pull the cake out when a toothpick comes out with moist crumbs, not clean. For extra insurance, bake at 325°F instead of 350°F for 5-10 minutes longer—this prevents rapid surface drying.
How do I make this cake gluten-free?
Replace the all-purpose flour with a 1:1 gluten-free baking flour blend (like Bob's Red Mill) plus ½ teaspoon xanthan gum. Reduce the almond milk by 2 tablespoons since GF flours absorb more liquid. Test your blend first with a small batch to adjust moisture levels.
Can I use regular cocoa powder instead of Dutch-processed?
Technically yes, but Dutch-processed cocoa gives a smoother, richer flavor. If using regular cocoa, add ¼ teaspoon baking soda to the dry ingredients to neutralize its acidity. You may also need to reduce the sugar slightly (¼ cup less) since regular cocoa tastes more bitter.
Is this cake suitable for a 2-layer or 3-layer design?
This recipe makes perfect 2 layers, but you can easily adapt it for 3 layers by using 8-inch pans instead of 9-inch. Reduce each layer's batter by ⅓ and bake for 25-30 minutes. For a taller cake, chill between layers for 15 minutes to prevent collapsing.