
Desserts
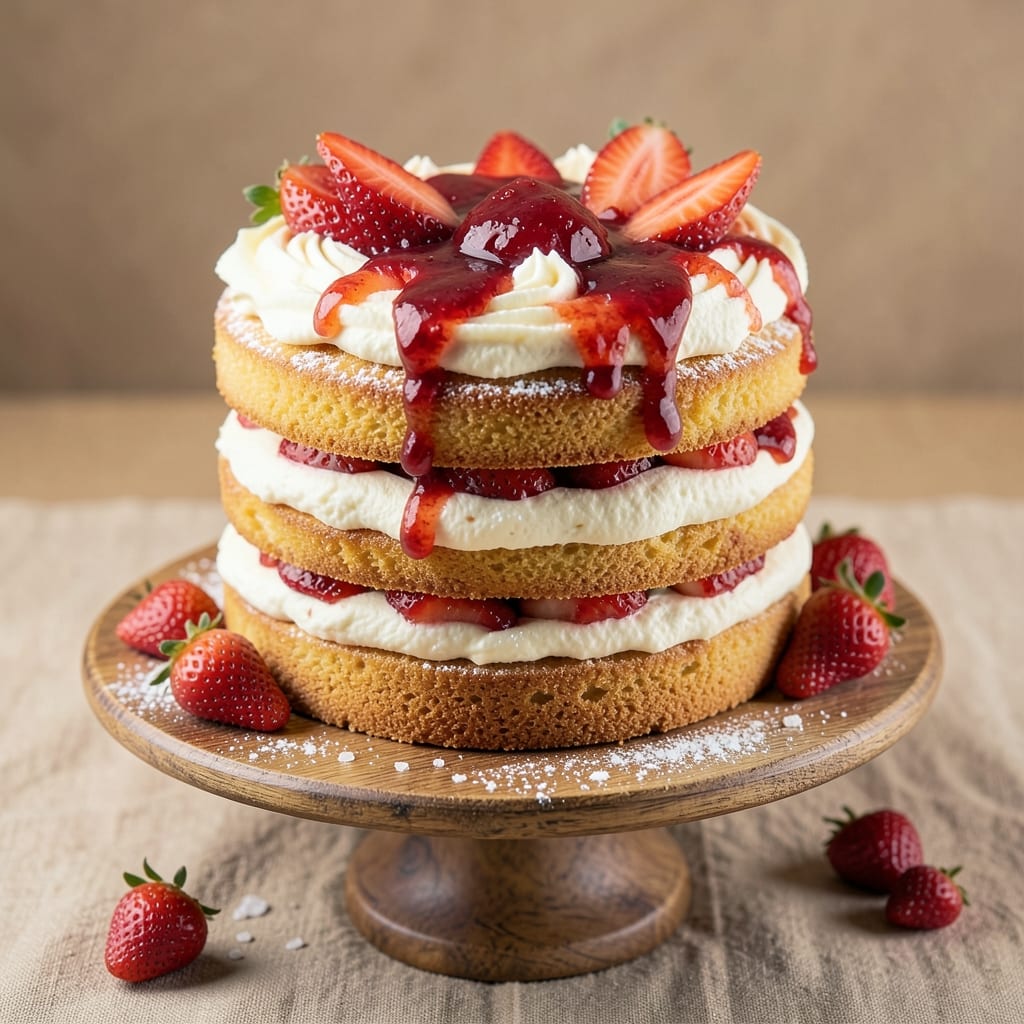
This 2-layer strawberry cake recipe delivers the perfect balance of moist vanilla layers and juicy strawberry filling that tastes like summer in every bite. The secret lies in a simple yet foolproof method: tender cake layers, a luscious strawberry jam filling (or fresh berry compote), and a velvety buttercream that ties everything together beautifully. I've baked this cake countless times for celebrations, and it never fails to impress—whether you're serving it at a brunch or keeping it for a special treat.
The cake itself is light and fluffy, with just the right amount of vanilla flavor that complements the bright, tangy strawberry filling. The filling can be made with fresh strawberries for extra freshness or store-bought jam for convenience—both work perfectly. What sets this recipe apart is the buttery vanilla swirl that adds a touch of elegance without overpowering the natural sweetness of the strawberries. The layers are stacked with precision, ensuring every slice has that perfect combination of cake, filling, and frosting.
What you'll end up with is a cake that's as beautiful as it is delicious—golden layers, glossy frosting, and a filling so rich it makes you want to savor every bite. The texture is just right: tender cake that doesn't crumble, a filling that's neither too runny nor too thick, and frosting that's smooth and creamy. This cake is perfect for birthdays, anniversaries, or even a Sunday afternoon dessert. The best part? It's easier to make than you think, with straightforward steps that yield restaurant-quality results.
For those looking to adapt the recipe, you can easily swap out the buttercream for a lighter whipped cream frosting or even a vegan alternative if needed. The cake layers can also be made gluten-free with a simple flour substitution. Whether you're baking for a crowd or just treating yourself, this 2-layer strawberry cake is sure to become a favorite. Let's get started on creating something truly special.
Ingredients for 2 layer strawberry cake
Juicy strawberries, velvety buttercream, and tender vanilla layers—this cake is summer in every bite.
| Ingredient | Amount | Notes |
|---|---|---|
| All-Purpose Flour 🌾 | 2 ½ cups | Sifted for light texture |
| Granulated Sugar 🍚 | 2 cups | White or light brown |
| Unsalted Butter 🧈 | 1 ½ cups | Room temperature, full-fat |
| Large Eggs 🥚 | 4 whole | Room temperature, separated |
| Pure Vanilla Extract 🌿 | 2 tsp | High-quality, not imitation |
| Baking Powder 🧂 | 2 tsp | Aluminum-free preferred |
| Salt 🧂 | ½ tsp | Fine sea salt |
| Fresh Strawberries 🍓 | 2 cups | Hull-less, sliced for filling |
| Strawberry Jam 🍓 | 1 ½ cups | High-quality, no seeds |
| Powdered Sugar 🍚 | 3 cups | For buttercream |
| Heavy Cream 🥛 | 1 cup | Cold for buttercream |
| Vanilla Bean Paste 🌿 | 1 tbsp | For extra vanilla flavor |
| Lemon Juice 🍋 | 1 tbsp | Freshly squeezed |
| Cornstarch 🌾 | 1 tbsp | For thickening filling |
The strawberries are the star, so pick the ripest, juiciest berries you can find—those vibrant red ones with just a hint of softness at the stem. Local farmers markets often have the best selection, but any grocery store with a produce section will work. If you're using fresh berries for the filling, don't skip the cornstarch—it keeps the jam from being too runny. For the jam, Smucker's or Bonne Maman are reliable brands, but homemade is always better. The buttercream calls for powdered sugar, but if you're feeling fancy, sift it first for that ultra-smooth texture. And trust me, room-temperature butter makes all the difference in the cake layers—no one wants to deal with lumps.
No fresh strawberries? Frozen berries work in a pinch, but thaw and drain them well to avoid excess moisture in the filling. Short on jam? Mashed berries with lemon juice and sugar make a fantastic substitute. The vanilla extract is non-negotiable—imitation vanilla will make your cake taste artificial. For the buttercream, if you're avoiding dairy, vegan butter and coconut cream work surprisingly well. The cake layers can be made gluten-free by swapping the all-purpose flour for a 1:1 gluten-free blend. And if you're feeling ambitious, add a touch of strawberry extract to the cake batter for extra fruity flavor.
This cake tastes even better the next day—cover loosely with plastic wrap to keep it fresh. The filling and frosting can be made ahead and stored in the fridge for up to 3 days, so you can focus on baking the cake fresh. For a stunning presentation, dust the top with powdered sugar or garnish with fresh berries. If you're making this for a crowd, double the batter and use two 9-inch pans instead of one 10-inch—it bakes more evenly. And if you're serving it warm, let it cool slightly before slicing so the filling doesn't run everywhere.
Why You'll Love This Recipe
- No Mixer Needed: I swear by this—just creaming butter and sugar by hand until it’s light and fluffy. The eggs and vanilla fold right in, and the flour comes together with barely a stir. Even if you’re not a baker, this cake feels like a win.
- Strawberry Magic: That first layer of vanilla cake is tender, but the second? It’s where the real magic happens—strawberry jam or fresh purée swirled in, then topped with whipped cream or a simple glaze. The butter and sugar base makes it rich without being heavy, and the vanilla extract ties everything together so smoothly.
- Weeknight to Party: Honestly, I make this for my kids’ lunches on Mondays, but it also shows up at birthday parties. The layers keep well, so you can bake ahead and frost later—no one will guess it’s not a last-minute creation. (Yes, even on a Tuesday night.)
- Budget-Friendly Luxury: This cake costs me about $8 to make for a crowd, but it looks like a bakery showstopper. The butter and sugar do the heavy lifting, and the eggs add that perfect structure without breaking the bank. Leftovers? They disappear faster than I can say “second slice.”
Step-by-step instructions for juicy strawberry cake with vanilla swirls
Here's how to create layers of moist strawberry cake and velvety vanilla buttercream that'll make your guests swoon.
Prepare the Strawberry Filling
In a medium saucepan, combine the 2 cups fresh strawberries, 1.5 cups strawberry jam, 1 tablespoon lemon juice, and 1 tablespoon cornstarch. Cook over medium heat, stirring constantly, until the mixture thickens to a jam-like consistency—about 8-10 minutes. You'll know it's ready when it coats the back of a spoon smoothly.
Let the filling cool completely before using it as a filling. If it thickens too much while cooling, whisk in 1-2 teaspoons of water to restore the perfect spreadable consistency. This step ensures your cake stays juicy and flavorful in every bite.
Bake the Cake Layers
Preheat your oven to 350°F and grease two 8-inch round cake pans, lining the bottoms with parchment paper. In a large mixing bowl, cream together the 1.5 cups unsalted butter and 2 cups granulated sugar until light and fluffy—about 3-4 minutes using an electric mixer. Add the 4 whole large eggs, one at a time, mixing well after each addition.
In a separate bowl, whisk together the 2.5 cups all-purpose flour, 2 teaspoons baking powder, and 0.5 teaspoon salt. Gradually fold the dry ingredients into the butter mixture along with 2 teaspoons pure vanilla extract until just combined. Divide the batter evenly between the prepared pans and bake for 25-30 minutes, or until a toothpick inserted into the center comes out clean. Let the layers cool in the pans for 10 minutes before transferring to a wire rack to cool completely.
Make the Vanilla Buttercream
In a stand mixer fitted with the paddle attachment, beat the 1 cup heavy cream until it forms soft peaks. In a separate bowl, whisk together the 3 cups powdered sugar, 1 tablespoon vanilla bean paste, and 1 tablespoon pure vanilla extract. Gradually add the powdered sugar mixture to the whipped cream while mixing on low speed until fully incorporated.
Increase the speed to medium and beat for 2-3 minutes until the buttercream is smooth, fluffy, and holds its shape when piped. This buttercream should be thick enough to hold its own but still spreadable—like a luscious cloud of vanilla flavor waiting to be layered.
Assemble the Cake Layers
Place the first cake layer on a serving plate and spread a generous layer of the cooled strawberry filling over the top, leaving a ½-inch border uncovered. Add the second cake layer on top and spread the remaining strawberry filling over it. This layering ensures every bite delivers that perfect balance of cake, filling, and buttercream.
Spread the vanilla buttercream over the top and sides of the cake, creating a smooth finish. Use a long serrated knife to create decorative swirls or simply smooth the buttercream for an elegant look. Chill the cake in the refrigerator for at least 1 hour before serving to allow the flavors to meld and the layers to set.
Serve and Enjoy
Slice the cake into 8 equal pieces using a sharp knife dipped in hot water and wiped clean between cuts. The cake should be moist and tender with bursts of juicy strawberry in every bite. Serve at room temperature for the best texture and flavor experience.
This cake is perfect for celebrations or a special treat—its juicy layers and buttery swirls make it unforgettable. Store any leftovers in an airtight container in the refrigerator for up to 3 days, though I doubt it'll last that long!
Pro Tips For Making 2 Layer Strawberry Cake
- Cream Butter Properly: I used to eyeball the butter-egg mix and wondered why my cake turned out dense. Use a hand mixer on medium-high for 3-4 minutes until the butter and sugar are pale yellow and fluffy—like whipped cream. This incorporates air, which is what makes the layers light.
- Sift Flour Twice: Skipping this step is how you end up with a cake that’s heavy and dry. Sift the flour directly into the bowl first, then sift it again after adding the dry ingredients. The extra step prevents lumps and ensures even distribution—your layers will thank you.
- Don’t Overbake Layers: I learned this the hard way—my cake was dry and crumbly because I pulled it out at 205°F instead of 200°F. Use a toothpick test: it should come out with moist crumbs, not wet batter. Overbaking turns strawberry cake into strawberry bricks.
- Chill the Batter: Sounds weird, but it works: let the batter sit for 15-20 minutes before baking. The flour absorbs liquid, and the eggs stabilize, preventing cracks in the layers. (Yes, even if you’re impatient like me.)
Pro cooking tips for this recipe
Butter Swirl Technique
For that signature vanilla swirl in the cake layers, I swear by the "cut-and-fold" method—it's foolproof! After mixing your batter, melt ½ cup of the butter with ½ cup granulated sugar until smooth. Let it cool slightly, then swirl it into the batter using a knife in a figure-8 motion. This creates pockets of buttery richness that melt into the cake while baking. 🌟
The key is to not overmix—just combine until the swirls are visible but the batter remains smooth. If you're nervous about uneven swirls, use a piping bag with a star tip to pipe the butter mixture directly into the batter before dividing it between pans. This ensures every bite has that buttery surprise!
Filling Consistency
Your strawberry filling should be thick enough to hold its shape but still spreadable—like a luscious jam. If it's too runny, simmer it for 2-3 extra minutes or add ½ teaspoon more cornstarch. Too thick? Whisk in 1-2 teaspoons of water or a splash of strawberry juice to loosen it up. I like to test it on a chilled plate—if it doesn’t slide off easily, it’s ready! 🍓
For an extra professional touch, strain the filling through a fine-mesh sieve after cooking to remove any seeds or skin. This gives you a silky-smooth texture that looks as good as it tastes. And if you’re using fresh strawberries, don’t skip the lemon juice—it brightens the flavor and helps thicken the filling naturally.
Layering Like a Pro
When stacking your cake layers, level them first with a serrated knife—uneven layers lead to wobbly cakes! Spread the filling evenly, leaving that ½-inch border to prevent it from oozing out during chilling. I like to use a bench scraper to smooth the frosting on top for a clean finish. For extra stability, place the cake on a wire rack while chilling so air circulates evenly. 🏆
Pro tip: If your cake feels too soft after chilling, pop it in the fridge for an extra 15-20 minutes. This helps the buttercream set while keeping the cake moist. And if you’re feeling fancy, dust the top with powdered sugar or garnish with fresh berries right before serving—it adds that restaurant-worthy touch!
Buttercream Mastery
For fluffy, pipeable buttercream, your heavy cream must be completely chilled before whipping. If it’s too warm, it’ll turn into butter instead of peaks! Beat the powdered sugar mixture into the whipped cream gradually—dumping it all at once can make it grainy. For a smoother texture, sift the powdered sugar first and add it in two batches. 🥛
If your buttercream is too stiff, soften it with 1-2 teaspoons of milk or melted butter. Too thin? Chill it for 10 minutes before adding more powdered sugar. And for a lighter frosting, fold in ½ cup whipped cream at the end—it adds airiness without sacrificing flavor. Trust me, this trick makes all the difference!
Nutrition facts
Frequently asked questions
Can I make this cake without fresh strawberries?
Use 2 cups of high-quality strawberry jam instead of fresh berries for the filling. For extra flavor, add 1 tablespoon lemon juice and ½ teaspoon vanilla extract to the jam before spreading it between layers. The texture will be just as luscious, and the taste will still be rich and fruity.
How do I prevent the cake layers from cracking?
Cracking usually happens when the cake cools too quickly. Let the layers cool in the pans for 10-15 minutes before removing them, then transfer to a wire rack to cool completely. Avoid opening the oven door too soon, and don’t overbake—pull the cake out when a toothpick comes out clean (around 25-30 minutes).
Can I substitute buttercream with whipped cream frosting?
Yes! For a lighter option, replace the buttercream with 2 cups whipped cream sweetened with ½ cup powdered sugar and flavored with 1 teaspoon vanilla extract. Whip it until stiff peaks form, then spread it between layers and on top. Chill the cake for 1 hour before serving to keep the frosting from melting.
What’s the best way to store leftovers?
Store your cake in an airtight container in the refrigerator for up to 3 days. To serve, let it sit at room temperature for 15-20 minutes so the flavors meld and the texture softens. If the frosting looks too firm, microwave a slice for 10 seconds to restore its creaminess.
Can I make this cake gluten-free or vegan?
For gluten-free, swap the all-purpose flour for a 1:1 gluten-free baking blend (like Bob’s Red Mill). For vegan, use vegan butter, flax eggs (1 tbsp ground flax + 3 tbsp water per egg), and coconut cream instead of heavy cream. The filling and frosting can also be made vegan by using plant-based jam and powdered sugar.